Difference between revisions of "Creating custom vents"
From Protocase Designer Documentation
m |
m |
||
| Line 2: | Line 2: | ||
''To make a vent slot using the grid''<br> | ''To make a vent slot using the grid''<br> | ||
| − | # | + | #In the Face Editor, turn on the [[Face_Editor#Using_the_grid | '''grid''']]. |
#Draw a rectangle and make it the size you want it to be. It will snap to the grid lines. | #Draw a rectangle and make it the size you want it to be. It will snap to the grid lines. | ||
#:[[File:Vent_grid1.jpg]] | #:[[File:Vent_grid1.jpg]] | ||
Revision as of 14:51, 8 September 2015
Here are two ways to make a standard vent slot with rounded ends. If you use the grid, you can place (and evenly space) many of them quickly.
To make a vent slot using the grid
- In the Face Editor, turn on the grid.
- Draw a rectangle and make it the size you want it to be. It will snap to the grid lines.
- Draw a circle at each end of the rectangle, and let them snap to the top and bottom of the rectangle.
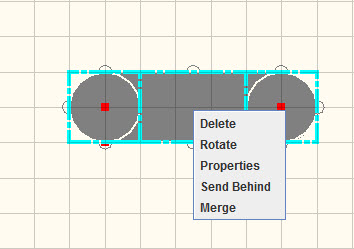
- Click Edit, select the three objects, right-click within the selection box and choose Merge.
- The vent cutout is complete.


To make a vent slot without using the grid
- Draw a rectangle and specify its Width and Height in the Properties panel.
- Draw a circle at each end of the rectangle, and make their Diameters the same as the Height of the rectangle.
- Click the Measure tool, select the center of the rectangle and the center of one circle, change the distance to "0.0", then repeat this step for the second circle.
- Merge the three objects.
- The vent cutout is complete.
Note: You can make a vent cutout of any shape using the Path tool.