About Graphics (Silkscreening and Digital Printing)
You can use silkscreening or digital printing for labeling (switches, ports, on/off functionality, etcetera), branding, and decoration, on flat panels, parts, and assembled enclosures. Silkscreen printing passes ink through a porous fabric, thus creating a sharp-edged single-color image from a stencil; multiple color images are created by incorporating multiple stencils, one graphic and screen for each color. In digital printing, colors are created by blending various densities of small droplets of Cyan, Magenta, Yellow and Black. Silkscreening is ideal for flat graphics with a limited number of colors, whereas digital printing is best for graphics with high amounts of detail (such as a gradient finish, CGI effects or overlapping colors), or when multiple colors are used in one graphic. We recommend you use digital printing for low-volume jobs. Silkscreening has a setup cost for every color on every face but is less expensive to run, while digital printing has no setup cost but is more expensive per job. For a detailed comparison along with accepted file formats for each method, please see [Silkscreen Vs. Direct Digital Printing].
General Notes
- Whether silkscreening or digital printing, any powdercoat that has "Sandtex" in the name requires a minimum font size of 11 points.
- A grained finish on stainless or aluminum can be silkscreened, but not digitally printed.
Notes on Digital Printing
- You cannot use digital printing on metal if the color is "None"; it does not stick to bare metal so the face must have a color.
- No part of the face being printed can be masked, because the reflection from the face will damage the print heads.
- You cannot use digital printing on aluminum or stainless steel with a grained finish.
- The printed area must be no more than 46" high, 46" wide, and 24" long.
- The face and all its attachments must be entirely flat. Nothing (including PEMs and flanges) can stick up above the surface.
- The inside of the face cannot be printed.
Notes on Silkscreeening
- Silkscreening should not be used for graphics with complex coloring or gradients. Sometimes the graphics file that a user adds Designer looks like a single color to the naked eye, but Designer picks up the multiple hues (shades of the color) in the graphic and assigns a screen to each color. That causes the design file to include extra silkscreen charges, or silkscreen charges when there is no silkscreen at all.
- If you want to silkscreen an image that has feathered or blurred edges, you must first remove the feathering (using your graphics editor). This includes text with font smoothing, which uses many shades to make pixellated edges look softer. These are interpreted by the Protocase manufacturing process (whether or not you use Protocase Designer) as separate silkscreens. Even when using Protocase Designer, when you import a silkscreen, Designer uses the nearest color that we stock, but it still leaves a lot of colors. Each color is a different silkscreen, and each silkscreen increases the cost. Therefore, when designing graphics for silkscreening, disable the font smoothing and similar functions if possible. Alternatively, you could specify digital printing instead of silkscreening for any face that has such an image on it.
- When silkscreening on top of powder coating, the final quality is affected by the type of powdercoat finish chosen for the enclosure. Heavily textured finishes can degrade the screen print quality. We recommend selecting a smooth or lightly textured powdercoat where silkscreening is required. For details including examples of good and bad contrasting colors, see Contrast between silkscreen and powder-coat colors.
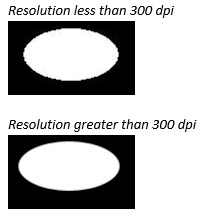
- Image quality is critical to the quality of the final screened image on the enclosure. The porous fabric used for silkscreening contains 300 threads per inch, therefore the image you provide must be of at least that much detail. Images with under 300 dots per inch (dpi) will not be of desired quality and can result in blurred or jagged edges.
- Ensure that fasteners or other hardware do not cover the silkscreened graphics or text. Fasteners often leave small creases that result in breaks in silkscreened lines; for example:
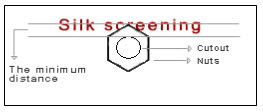
- Place all images and texts at least 0.25" from any edge of the enclosure. Enclosure edges are slightly rounded and cannot be silkscreened. If you are using Protocase Designer, the Face Editor shows the bend area in red, to indicate that it cannot be silkscreened.
- Exercise caution when selecting colors to be used for screen printing. Placing dark texts and/or graphics over a black finish will result in an almost unreadable text. Similarly, placing a light color texts and/or graphics on a light background will be almost unreadable. For details, please see Contrast between Silkscreen and Powder Coat Colors.
- If your graphics and text contain more than one color, please provide each colored image as a separate file or group them separately. Each distinct colored groups (or layer) are silkscreened one at a time.
- Our standard stocked colors for silkscreening are shown here (scroll down to "Stocked Silk Screening colors"). Please contact technical support if you require a non-standard color.
See Also:
- Adding silkscreening or direct digital printing using Protocase Designer
- Adding silkscreening or digital printing without using Protocase Designer
- For detailed specifications on digital printing including liminations, finishes, fonts, colors, printing over cutouts, and image placement, see [Protocase Digital Printing].
- For a side-by-side comparison of silkscreening and digital printing, see [Silkscreen vs. Direct Digital Printing].
- For detailed specifications on silkscreening including samples, stocked colors, and file formats, see [Protocase Silkscreening].
- Tell Me About Finishes

