Protocase Designer Version 4.5 Release Notes
The following features have been added or enhanced in Protocase Designer Version 4.5.x
Version 4.5.2 Release Notes
Version 4.5.2 adds the ability to transfer your enclosure design; for example, you can transfer a U Shape to a Rackmount, or from one type of Extruded enclosure to another.
Version 4.5 Release Notes
Assemblies & Materials
Copper
Designer now supports copper for cases, brackets, etcetera. Known Issues: Currently, no special color is used for copper-no finish, and sharp inner corners will need to be altered by our technicians prior to manufacturing. This functionality will be added in a future release.
Templates
- Templates have been added for the following brackets:
- Angled Offset Bracket
- Angled U Bracket
- Helicopter Bracket
- Triangular Bracket
- L Bracket with Flanges
- The following templates for computer enclosures have been added, with the mounting hardware for the motherboard, and cutouts for the io ports and expansion card slots, all in place. (The motherboard area includes a set of nuts along with standoffs that you can screw into those nuts, since the boards themselves do not have all the mounting spots.)
- ATX Template - an L-shaped enclosure for an ATX motherboard
- Mini ITX Template - a U-shaped enclosure for an ITX motherboard, without a PCI (expansion card slot)
- Mini ITX Template - an L-shaped enclosure for an ITX motherboard, with a PCI
- Diagrams showing sizing have been added to most templates.
Consolet enclosures
In Version 4.4.9-Feb09,16, an overhang of .030" was added to each Consolet enclosure. (Note that the overhangs are not yet shown in the template images, but can be seen in the 3D View if you make the enclosure smaller and zoom in on the edge between the cover and the side.)
L-Shaped enclosures
- The height of an L-shaped enclosure is now limited to less than 11 inches (due to a manufacturing constraint).
Brackets
- A number of new brackets have been added; see above listing under Templates. Note that the L Bracket is now named Angled L Bracket, for consistency with the names of the new brackets.
- Manufacturing constraints and illustrations have been added to all bracket templates.
- Since brackets can now be made of copper, they can be used as precision bus bars in your enclosure design. For some examples, see Protocase Copper Bus Bars.
Rackmounts
- The default thicknesses on taller rackmounts have been increased to over 4 U. (U is a standard unit in a rack; one U is equal to 1.75".)
Screws
- You can select the screw type and color for an enclosure when loading a new assembly.
- You can see information on screws, and optionally replace a screw with a PEM (or replace a PEM with another PEM).
- See also notes on adding screws to a face and About Screws.
Finishing
Masking
Masking is now allowed on aluminum and on cold rolled steel, but a warning is displayed for cold rolled steel (because it will rust). You can also price masking.
Cutouts
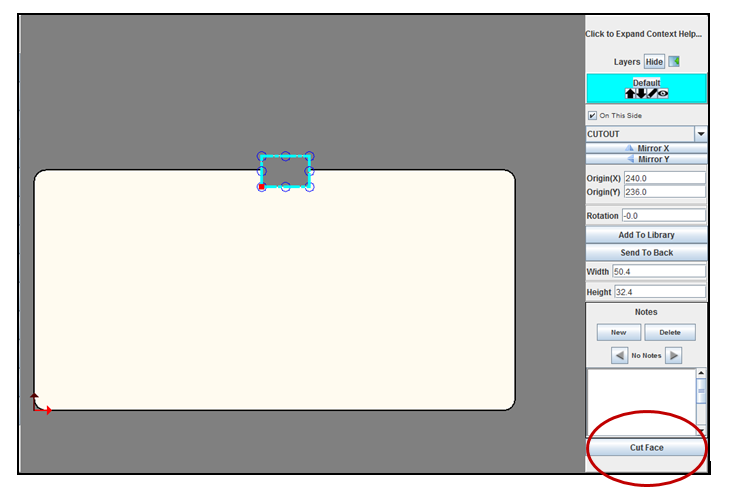
Cut Face button in Properties panel
If you select a cutout that lies across the face boundary, or move it so that it does, the new Cut Face button is displayed at the bottom of the Properties panel. Clicking the button will cut the face boundary.

Note: This feature is not affected by any of the Preferences settings; if you have enabled Prompt for whether to cut the face for bad placement on the boundary, you still receive the prompt that lets you reject the placement across the boundary, allow it as is, or allow it and cut the face boundary. The Cut Face button is now also provided so that you have the option to allow the placement, but not make the cut until you have checked all dimensions.
Cutout Library
- Brackets and cutouts for motherboards, I/O, card slots, and hard drive brackets have been added to the Hardware section of the cutout library. You can use these with the new computer enclosure templates or any computer enclosure you design.
- The Cutout Library includes some new items contributed to the online library since the last General Release.
- The Cutout Library no longer includes fasteners (nuts, studs, standoffs); these items can now be placed only using the Cutout Library and Fasteners > Place Self-Clinching Fasteners command in the Face Editor.
Configuring Designer to Use a Proxy Server
If your company uses a network configured such that your computer accesses the Internet through a proxy server, you can configure Designer to use the proxy settings.
- In Designer, choose Edit > Preferences. The Preferences dialog opens.
- Under Proxy Settings, select the Use Proxy for http checkbox, then enter the proxy address and port number (supplied by your network administrator).
- Click OK to save the settings and close the Preferences dialog.
Printing & Silkscreening
Digital print
- Direct digital printing now supports larger enclosures, and is the default printing method and a valid option for all graphics unless the image is on a bare or grained finish (in which case Designer prevents you from that application), or is over 46"x46" or the face it is printed on is more than 24" high. If you choose silkscreening when digital print is a valid option, Designer will recommend using digital print instead. (If you ignore the recommendation, Designer will not recommend it again for that design file.)
- Designer menus and commands previously using the term Silkscreen now use the term Graphics, because all commands used for silkscreening are also used for direct digital printing.
See also:
- Tell Me About Graphics (Silkscreening and Digital Printing)
- Adding silkscreening or direct digital printing using Protocase Designer
- Adding silkscreening or digital printing without using Protocase Designer
- Limitations, finishes, fonts, colors, printing over cutouts, and image placement.
- Side-by-side comparison of silkscreening and digital printing.
New fonts
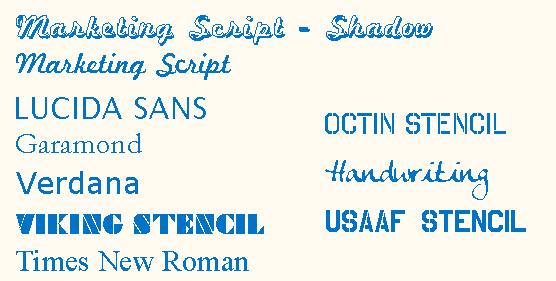
The following fonts have been added: Handwriting, Lucida Sans, Garamond, Verdana, Viking Stencil, Times New Roman, USAAF Stencil, Marketing Script-Shadow, Marketing Script, and Octin Stencil.

Special (Unicode) characters
You can include special characters in text.
Exporting images
You can export an image from a face.
Workflow Enhancements
- Cleaner, better controls in the Preferences dialog box. Note that you can no longer change the axis color.
- Better design checks and messages (for instance, a warning is displayed if cutouts are too small to be cut).
- Shorter time between ordering and receiving your enclosure, due to the better interleaving of Designer and our direct-to-order processes.
- New tutorials on the wiki:
Known Issues
A few problems exist in this version; please see Known Issues for details. As they are fixed, they will be recorded on the Software Fixes Released page, along with links to the Beta version containing the fixes.
